How to Make Crispy Rice (Oven + Air Fryer)
Learn how to make crispy rice in the oven or air fryer with this easy, tested method. Using cold leftover rice, simple ingredients, and a few key techniques, you’ll get perfectly golden, crunchy rice every time — perfect for bowls, salads, and more.
Ingredients
- 4 cups cooked basmati rice* cooled and dry (preferably day old)
- 1 tablespoon sesame oil
- 2 teaspoons chili garlic sauce does add some spice, option to omit or reduce to 1 teaspoon
- 1/4 teaspoon kosher salt
- 1/8 teaspoon ground black pepper
Instructions
- Prep: Preheat oven to 425 degrees F.
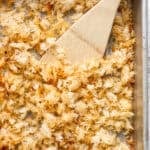
- Mix: Place the cooked rice on a large, rimmed baking sheet (do not line with foil or parchment) and add the rest of the ingredients on top. Toss to fully combine. Spread out evenly on the pan (as thin of layer as possible).
- Bake: Move the sheet pan to the oven, middle rack, and cook for 15 minutes and then check and toss (so any rice that wasn't on top getting crispy can be moved around). Keep cooking and tossing in 5-7 minute increments until it reaches your desired crispness - for us this took around 30-40 minutes total (See Notes on Cook Time**).
- OPTIONAL Quick Broil: if you feel your rice just isn't getting that crispiness you are looking for - pop under the broiler (second level from the top so there is a little room) and broil for approx. 1 minute (we also tested 2 minutes and it burned so be cautious and watch it carefully - 1 minute was fine - my oven is at 500 degrees F. on it's high broil setting which is what we used).
- Cool + Serve: Let cool for a few minutes (rice will crisp up more as it cools) and enjoy any way you want - we love using it in our Crispy Rice Salad!
Video
Notes
- *Rice: Two things: 1) for best results use day-old rice, that being said, we also tested this with just cooked and then cooled rice and ... it still turned out pretty dan good. 2) I also tested this using 2 bags of the quick microwaveable rice and it also turned out - if you are in a pinch - you might just end up with slightly more chewy rice. We used basmati rice every time we tested so that is our recommendation, but feel free to switch it up to long grain white rice, jasmine, etc.
- **Cook Time Varies For This One: for this recipe there are quite a few variables (older rice vs. new rice, how cool your rice is, how hot your oven runs, etc) so after about 20 minutes start checking frequently to determine when you rice is "done" per your personal preference and given the variables you are working with! Use our cook time as a guideline and keep an eye on the rice because cook time may vary.
- Air Fryer Method: Mix ingredients together and then pour out into parchment-lined air fryer. Cook at 400 degrees for 10 minutes and then toss, trying to bring the outside bits (which will be crispier) inward and the inside bits outward so it can all crisp evenly (I try not to break up bigger chunks). Continue cooking in 1-2 minutes (tossing as-needed) until you have reached your desired consistency. Air fryers vary - ours was mostly crisp, with some soft pieces, after 14 minutes. Note: I cut the recipe in half so I could make a thinner layer of rice - I have a regular/standard-sized air fryer.
- Chili Garlic Sauce: here is the chili garlic sauce we used (affiliate link). It does add some spice so feel free to just add 1 teaspoon or omit completely.
- Soy Sauce: especially if you omit the chili garlic sauce - feel free to add about 2 teaspoons of soy sauce to add a touch of flavor!
- Storage: leftover crispy rice can be kept in an airtight container on the counter for up to 2 days and then needs to be used - it can be stored in an airtight container in the fridge, but it will most likely lose some of that crispiness.
- Reheat: Feel free to reheat gently in a skillet to warm it back up.
- Serving: feel free to use just as a fun side dish, in this salmon crispy rice salad or use it any of our many rice bowl recipes we have on the site and swap out regular rice (like our bang bang shrimp rice bowl or our baked salmon sushi bowl).
Nutrition
Calories: 239kcal | Carbohydrates: 45g | Protein: 4g | Fat: 4g | Saturated Fat: 1g | Polyunsaturated Fat: 2g | Monounsaturated Fat: 2g | Sodium: 270mg | Potassium: 56mg | Fiber: 1g | Sugar: 1g | Vitamin A: 0.3IU | Calcium: 16mg | Iron: 0.3mg
Did you make this recipe?Tag @thewoodenskillet on Instagram!
